Regarding flash, you can still use a flash even though you have only one sync port on the lens.
There are two options.
- Using PC sync split cable.
You can add a Y- PC sync split cable on the PC port on the lens.
This is the Y-PC sync split cable.
https://www.amazon.com/gp/product/B0078ZCX6Y/ref=ppx_yo_dt_b_asin_title_o02_s00?ie=UTF8&psc=1
Then one terminal of the split cable is connected to the main sync cable. The other terminal is connected to your flash or a transmitter. - Using PC sync OUT port on the digital back
If your digital back has a PC sync out port (Most digital backs have it.), you can connect your flash or transmitters through the out port and you can use flashes or strobes.
Note some digital backs cannot capture the flashlight if the shutter speed exceeds 1/100 when certain lenses are used. However, this isn’t a big deal if you don’t use high-speed shutters with flash indoors.
If the adapter is not perfectly fit on your camera body or your digital back, please follow the processes below.
Mounting Adapter and Sensor (Adjusting the Support Hooks at the bottom)

If the Support Hooks (2 screws) at the bottom are too loose and the bottom of the digital back wobbles, or the space under the Support Hooks is too tight for the clasp of the digital back to fit underneath, adjust the height of the bottom Support Hooks by turning them slightly using a 2mm Hex Key. Turn the screws 45 degrees at a time and check the fit of the mount.

Mounting Adapter and Camera Body (Adjusting the Body Mount Pins)


When connecting the adapter to the camera body, if there is a gap between the body and the adapter, or if you cannot lock the locking lever at the bottom because the Body Mount Pins are too short, adjust the height of each Body Mount Pin by turning them slightly using a 2mm Hex Key.
Turn the screws 45 degrees at a time and check the fit of the mount.
- To tighten the Body Mount Pins to shorten the gap: Turn the screws clockwise.
- To loosen the Body Mount Pins to fix the lever issue: Turn the screws counterclockwise.

Important:
- After adjusting the Body Mount Pins, your camera may need focus calibration by adjusting the focus screen on top.
- Do not perform this adjustment unless you experience a mounting issue, as it can affect proper focusing. Also, avoid turning the screws more than a full rotation (360 degrees).
To capture images, the other words, to send shutter signals from your camera to a digital back such as a Leaf Credo, Phase One P, or Phase One IQ), you’ll need a Multi-connector cable. The specific Phase One part numbers for these cables are 50300143 or 50300144.
Here are your options to setup the cable between the camera and the digital back:
Option 1: Phase One Part #50300143
Option 2: Phase One Part #50300144 + Flash PC Sync to 2.5mm jack adapter
You can see how to configure the cables from the video link below.
https://youtu.be/M_djH8drUQY
If your Leaf Credo or PhaseOne kit included all parts in the original package, you will find a PhaseOne Multi-Connectors inside the box.
If you’re considering purchasing a used digital back, it’s possible the previous owner may not have included these essential cables. I highly recommend confirming with the seller that all original accessories, including the Multi-connector cables, are part of the kit before you make your purchase.
Should you or the seller not have the necessary cable, you’ll need to obtain one.
There is one more thing that you should know if you are using Credo, PhaseOne digital back. It’s “Two-Shot” method. Please get the information from the other article in the FAQ.
Accurate focusing in most medium format SLR cameras is affected by the focus screen, mirror, and flange-back distance. If you’re experiencing a focus issue, it can be difficult to pinpoint the exact cause.
Therefore, it’s recommended to have a professional diagnose and adjust the focus. However, if you have a thorough understanding of these components and can identify the source of the focus issue, you can attempt calibration with the focus screen or body mount pins.
Method 1: Adjusting the Focus Screen on Top of Camera
1) Remove the focus screen.


2) Mark the original position of each Adjustment Screw (4 screws).

3) Slightly rotate the Adjustment Screws to achieve proper focus. We recommend turning them in small increments (about 45 degree) each time you check focus. You may need a precision tool for this task.
Turning 180 degree makes about 0.1mm movement.
- Counterclockwise (Focus Screen Goes Up):
Focus will move front to back. (Treatment for front-focused issue) - Clockwise (Focus Screen Goes Down):
Focus will move back to front. (Treatment for back-focused issue)

Method 2: Adjust the Body Mount Pins on the Adapter
The adapter allows for minor focus adjustments by modifying the height of the Body Mount Pins (4 screws) used for mounting the camera body. (See instructions linked next for details on adjusting the Body Mount Pin length.[ LINK ] )
If the focus is back-focus, follow the steps below.
- Turn each of the 4 pins counter-clockwise in small increments (30 ~90 degrees each). It’s important to turn all 4 pins by the same amount.
- Repeat step 1 with 30 degrees until you achieve the desired focus.
- Important: Do not turn the pins more than a total of 720 degrees (two complete rotations).
Important: Avoid turning the screws more than a full rotation (360 degrees). If you reach this point and still experience focus issues, it likely stems from other factors on the camera and cannot be resolved with this method.
If the focus is front-focus, follow the steps above with clockwise direction.
There is absolutely no difference.
You can purchase our products on our eBay store or on this site. This site is our main store.
However, please note that the prices on eBay may be higher than those on our website. This is because eBay charges transaction and promotion fees, as well as taxes for using their platform. These fees can amount to around 25-30% of the final sale price.
Rest assured that the products listed on both sites are exactly the same, so you can choose to buy from either store based on your preference.
If you’re an international customer, we strongly recommend purchasing through the LensMod website.
We use the eBay International Shipping Center for international eBay sales. Customers need to pay high taxes and shipping fees. Also, shipping through the eBay International Shipping Center takes 3-4 weeks. However, through the LensMod website, shipping takes only one or two weeks, and the cost is much lower.
For making sure, before you find the sync cable for HxD series digital back, you need to have a solution regarding a power source for the digital back because HxD digital back doesn’t include any battery when you detach it from the camera body.
Power Source Option 1: FireWire from Computer
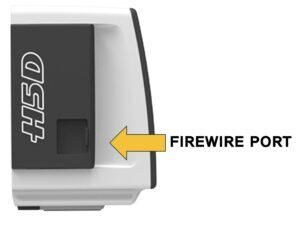
if you are using the digital back in your studio with a computer, the digital back can also receive power through a Firewire cable from the computer without using another power source.
Also there are power banks for FireWire port. They are useful idea for mobile environment without computer.
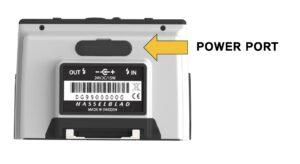
Power Source Option 2: Hasselbald Battery Adapter H (Model# 3053310)
Recent models of Hasselblad digital back like H4D 60, H5D or H6D have the dedicated power input port (12v or 24v).
H1D, H2D, H3D, and H4D (31, 40, 50, 200MS) don’t have the power input port. They only can be powered on by FireWire port
Hasselbald provides Battery Adapter for H.
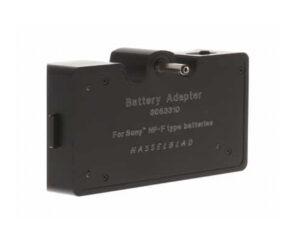
If you have a knowdege how to make power adapter, you can make the adapter or power bank yourself too.
Sync Cable
If you prepare the solution for the power source like the above, now you need to prepare a sync cable to operate RB67 / RZ67 and HxD with our adapter.
Please be aware that H1D cannot be worked with our adapter because H1D doesn’t have the Sync-In port.
PC Sync to 2.5mm Jack male
You need to connect the 2.5mm jack to “Sync-In” port on the side of the digital back.
Also, you need to select the camera type in the menu of your digital back to ‘Large Format’ type.
The “Two-Shot method,” for some One digital backs is a specific procedure required for certain older models, especially when used with other technical camera system.
What is the Two-Shot Method?
Normally, when you press the shutter button on a camera, the digital back “wakes up,” prepares to capture an image, and then captures it. In a “Two-Shot” or “Wake-Up” scenario, the digital back needs a separate signal to wake it up before the camera’s shutter is fired. WakeUp process to save battery power and to reduce the heat noises on picture.
This typically involves:
- “Wake-Up” Signal: You manually send a signal to the digital back to “wake it up” or put it in a ready state. This is often done by pressing a small button on a specialized “wake-up” cable connected to the digital back’s multi-connector port.
- Shutter Release: Within a short timeframe (usually a few seconds) after the wake-up signal, you then fire the camera’s shutter to take the picture.
The purpose of this method is often to conserve battery power on the digital back, as it’s not continuously in a “ready” state.
Which Phase One Models Require the Two-Shot Method?
The following models require the Two-Shot method for each shot
- Leaf Credo Series
- PhaseOne P20+P20+ / P21+ / P25+ / P30+ / P45+ (Kodak Sensor)
FYI, These models can use both the Two-Shot method (for battery conservation) and the Single-Shot method (where the back is always ready for capture, consuming more battery).
- PhaseOne P40+ / P65+ (Dalsa Sensor)
- PhaseOne IQ Series
Essential Accessories:
If you need to use the Two-Shot method, you’ll generally require:
- Phase One Multi-Connector (Multi-Cable): This cable connects to the digital back’s multi-connector port.
- Wake-up (Two-Shot) Cable or Converter: This cable typically has a button on it and connects to the multi-connector cable, sending the wake-up signal.
You need a PC Sync to 2.5mm Jack like the link below.
You need to connect the 2.5mm jack to “Sync-In” port on the side of the digital back.

Also, you need to select the camera type in the menu of your digital back to ‘Large Format’ type.
You need a PC Sync to 2.5mm Jack like the link below.
You need to connect the 2.5mm jack to “Sync-In” port on the side of the digital back.

Also, you need to select the camera type in the menu of your digital back to ‘Large Format’ type.
There are several options for taking pictures depending on what type of cable you prefer. (For IQ 1/2/3 series users, please don’t buy the multi-connector below because IQ 1/2/3 series is needed 8-pin multi-connector, not 12-pin multi-connector below.)
2-Shot Cable
Option 1
- 12-Pin Multi-connector to Lens sync (Part# 50300298)
https://www.photo-digitaltransitions.com/product/12-pin-multi-to-lens-sync-iq4-on-tech-cameras/ - 2-Shot adapter for PC Sync
https://vjk.ubp.mybluehost.me/product/wake-up-two-shot-cable-converter-adapter-for-pc-sync/
Option 2
- 12-Pin Multi-connector to 2.5mm female (Part# 50300306)
https://www.photo-digitaltransitions.com/product/12-pin-multi-connector-to-mini-jack-adaptor-cable/ - Lens sync to 2.5mm male
https://a.co/d/c4GYbjk - 2-Shot adapter for 2.5mm
https://vjk.ubp.mybluehost.me/product/wake-up-two-shot-cable-converter-adapter-for-2-5mm-jack/
Option 3
- 12-Pin Multi-connector to 2.5mm female (Part# 50300306)
https://www.photo-digitaltransitions.com/product/12-pin-multi-connector-to-mini-jack-adaptor-cable/ - Lens sync to 2.5mm male with wake-up button
https://www.photo-digitaltransitions.com/product/wake-up-cable/
1-Shot Cable
(The Credo digital back operates on the 2-shot method when used with any classic medium camera. However, if you use a 1-shot cable, you can still perform the 2-shot method with two single shots)
Option 4
- 12-Pin Multi-connector to Lens sync (Part# 50300298)
https://www.photo-digitaltransitions.com/product/12-pin-multi-to-lens-sync-iq4-on-tech-cameras/
Option 5
- 12-Pin Multi-connector to 2.5mm female (Part# 50300306)
https://www.photo-digitaltransitions.com/product/12-pin-multi-connector-to-mini-jack-adaptor-cable/ - Lens sync to 2.5mm male
https://a.co/d/c4GYbjk
Firstly, you need to confirm whether your digital back is designed for both 1-shot and 2-shot, or only 2-shot. You can determine this from the list below:
- P20+ / P21+ / P25+ / P30+ / P45+:
These digital backs have Kodak Sensors, which require the 2-shot method to take a picture because they need a wake-up signal before the actual shot. - P40+ / P65+ / IQ1,2,3 Series:
These digital backs have DALSA Sensors(we don’t know the manufacturer of IQ 2, 3 series’ sensor yet), which support standby mode. This mode allows them to take a picture with only 1 shot and does not require the 2-shot method. However, you can still choose to use the 2-shot method to save battery power by deselecting standby mode.
Now that you understand the different types of digital backs and their corresponding sync cables, you can choose the appropriate cable based on the model of your digital back and your preferred shooting method. (For IQ 4 series users, please don’t buy the multi-connector below because IQ4 series is needed 12-pin multi-connector, not 8-pin multi-connector below.)
2-Shot Cable
Option 1
- 8-Pin Multi-connector to Lens sync (Part# 50300143)
https://www.photo-digitaltransitions.com/product/long-sync-cable-to-multi-port/ - 2-Shot adapter for PC Sync
https://vjk.ubp.mybluehost.me/product/wake-up-two-shot-cable-converter-adapter-for-pc-sync/
Option 2
- 8-Pin Multi-connector to 2.5mm female (Part# 50300144)
https://www.photo-digitaltransitions.com/product/multi-conn-to-mini-jack-adaptor-cable/ - Lens sync to 2.5mm male
https://a.co/d/c4GYbjk - 2-Shot adapter for 2.5mm
https://vjk.ubp.mybluehost.me/product/wake-up-two-shot-cable-converter-adapter-for-2-5mm-jack/
Option 3
- 8-Pin Multi-connector to 2.5mm female (Part# 50300144)
https://www.photo-digitaltransitions.com/product/multi-conn-to-mini-jack-adaptor-cable/ - Lens sync to 2.5mm male with wake-up button
https://www.photo-digitaltransitions.com/product/wake-up-cable/
1-Shot Cable
(The Credo digital back operates on the 2-shot method when used with any classic medium camera. However, if you use a 1-shot cable, you can still perform the 2-shot method with two single shots)
Option 4
- 8-Pin Multi-connector to Lens sync (Part# 50300143)
https://www.photo-digitaltransitions.com/product/long-sync-cable-to-multi-port/
Option 5
- 8-Pin Multi-connector to 2.5mm female (Part# 50300144)
https://www.photo-digitaltransitions.com/product/multi-conn-to-mini-jack-adaptor-cable/ - Lens sync to 2.5mm male
https://a.co/d/c4GYbjk
| Digital Back | PC Sync | 2.5mm Jack | PhaseOne 8-Pin | PhaseOne 12-Pin | Etc |
| Leaf Valeo | X | ||||
| Leaf Aptus | X | ||||
| Leaf Aptus II | X | ||||
| Leaf Credo | X | ||||
| Mamiya DM | X | ||||
| Mamiya M | X | ||||
| PhaseOne P | X | ||||
| PhaseOne IQ1 | X | ||||
| PhaseOne IQ2 | X | ||||
| PhaseOne IQ3 | X | ||||
| PhaseOne IQ4 | X | ||||
| Hasselbald CFV | X | ||||
| Hasselbald CFV II | X | ||||
| Hasselbald H2D | X | ||||
| Hasselbald H3D | X | ||||
| Hasselbald H4D | X | ||||
| Hasselbald H5D | X | ||||
| Hasselbald H6D | X | ||||
| IEXPRESS | X |
Yes, any RZ67 series (RZ67 Pro, RZ67 Pro II, RZ67 Pro IID) can work with LensMod RZ67 adapters.
RZ67 adapters are designed to work with any Mamiya RZ67 series, RZ67 Pro, RZ67 Pro II or RZ67 Pro IID without any modification of camera or digital back because the communication path between the camera and the digital back is through the standard PC sync ports.
On the other hand, the original Mamiya adapter HX701, which communicates via contact pins on the adapter only supports RZ67 Pro IID.